What Is an Ice Dam?
An ice dam is a ridge of ice that forms at the edge of a roof, preventing melting snow from draining off the roof. As the snow on the roof melts, the water flows down the roof until it reaches the colder edge of the roof. There, the water refreezes, creating a barrier of ice. Over time, the ice dam can grow larger, preventing any water from draining off the roof and potentially causing water damage to the roof, walls, and ceilings of the building. Ice dams can also create a risk of injury if the ice falls off the roof or if someone attempts to remove the ice themselves.
Causes of Ice Dams
Poor insulation: When a roof is poorly insulated, heat from the interior of the building can escape through the roof, causing the snow on the roof to melt. This melted snow then runs down until it reaches the colder roof eaves, where it freezes, forming an ice dam.
Inadequate roof ventilation: Proper ventilation is important to help regulate the temperature of the roof and prevent the buildup of moisture. When a roof is poorly ventilated, warm, moist air can get trapped in the attic or roof space, causing the snow on the roof to melt and leading to the formation of ice dams.
Snow accumulation: The more snow that accumulates on a roof, the more likely ice dams form. When there is a lot of snow on a roof, it can be difficult for heat to escape from the interior of the building, and the weight of the snow can also contribute to the formation of ice dams.
Sun exposure: When the sun hits a roof, it can cause the snow to melt, which can then refreeze at the roof eaves, forming an ice dam.
Roof shape and design: Some roof designs, such as those with a low slope or a flat roof surface, are more prone to ice dam formation because they do not allow for proper drainage of water and melting snow.
Why are ice dams bad?
Water damage: When an ice dam forms, it can prevent melting snow from draining off the roof, which can cause water to back up under the shingles and leak into the building. This can cause significant water damage to the roof, walls, and ceilings, as well as potentially damaging the insulation and causing mold growth.
Structural damage: The weight of an ice dam can also put stress on the roof and cause damage to the structure of the building. In extreme cases, the weight of the ice can even cause the roof edge to collapse.
Energy loss: When an ice dam forms, it can also prevent proper ventilation of the roof space, which can lead to energy loss as hot air escapes from the building through the roof.
Safety hazards: Ice dams can also create safety hazards for people walking around the building, as the ice can fall off the roof and cause injury.
How can you tell if your house has an ice dam?
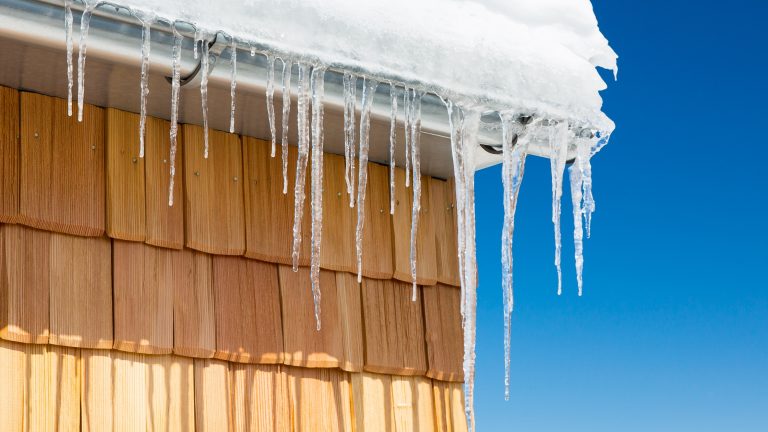
Icicles: Icicles hanging from the edge of the roof are a common sign of ice dams. However, it’s important to note that not all icicles are caused by ice dams, so it’s important to look for other signs as well.
Ice buildup: If you notice a buildup of ice on the edge of your roof, this could be a sign of an ice dam. You may also notice a layer of ice and snow on the roof that seems thicker than usual.
Water stains: If you see water stains on your walls or ceiling, this could be a sign that water is leaking into your house due to an ice dam.
Drips or leaks: If you hear dripping sounds or notice water leaking from your ceiling or walls, this is a clear sign of a water leak caused by an ice dam.
Damaged gutters or downspouts: Ice dams can also cause damage to your gutters or downspouts, so if you notice any damage or sagging, this could be a sign of an ice dam.
Temporary Removal Methods
Removing snow: Use a snow rake or roof rake to remove snow from your roof after each snowfall. This can prevent snow from building up and forming ice dams.
Deicing: Deicing your roof with calcium chloride or other ice melt products can help melt ice and snow on your roof, preventing ice dams from forming. However, be careful not to use rock salt, as it can damage your roof and gutters.
Box fans: Place box fans in your attic to circulate air and prevent warm air from accumulating near your roof. This can help prevent snow from melting and ice dams from forming.
Heated cables: Installing a heat cable on the edge of your roof and in your gutters can help melt the ice and snow and prevent dams from forming. However, be careful not to use them as a permanent solution, as they can be expensive to operate and may not address the underlying insulation and ventilation issues.
Snow-melting mats: Snow-melting mats can be installed on your roof to melt snow and help with ice dam prevention. However, they can be expensive and may not be effective in all situations.
Permanent Removal Methods
While the quick fixes and ice dam prevention products can be helpful, they are only temporary solutions. To permanently prevent ice dams, you need to address the underlying issues that are causing them to form. Here are some permanent solutions:
Preventing Ice Dams With Insulation
Check your existing insulation: Start by inspecting your existing attic insulation. Make sure that there is enough insulation in your attic, and that it is evenly distributed. Insulation should be at least 12 inches thick, and should be evenly distributed across the entire attic floor. If you see any areas that are not covered or that have insufficient insulation, add more.
Identify air leakage: Look for any air leaks that may be allowing warm air from your home to escape into your attic. Common areas for air leaks include recessed lights, attic hatches, and plumbing vents. Seal these areas with weatherstripping, caulk, or foam sealant.
Add insulation: Add more insulation to your attic as needed. You can add batts, blown-in insulation, or a combination of both. If you are using batts, lay them perpendicular to the floor joists, and make sure they fit tightly between the joists. If you are using blown-in insulation, use a blower machine to distribute the insulation evenly across the attic floor.
Consider a vapor barrier: If you live in a cold climate, you may also want to consider installing a vapor barrier. A vapor barrier helps prevent warm, moist air from entering your attic, which can cause condensation and lead to mold and rot. You can use plastic sheeting or a special type of insulation with a built-in vapor barrier.
Address other insulation issues: In addition to attic insulation, make sure that your walls and basement or crawl space are properly insulated as well. Insulation in these areas can help prevent heat escape and reduce the chances of ice dams forming.
Preventing Ice Dams With Ventilation
Inspect your existing ventilation: Check your existing attic vents to ensure they are not blocked by insulation, debris, or other materials. Make sure there are enough vents for the size of your attic and the pitch of your roof.
Install intake vents: Install intake vents in the soffit or fascia to allow cold air to enter your attic. This will help push warm air out through the exhaust vents.
Install exhaust vents: Install exhaust vents near the peak of your roof to allow warm air to escape from your attic. This will help keep your roof and attic at a consistent temperature and reduce the chances of ice dams forming.
Use baffles: Use baffles to prevent insulation from blocking the flow of air through your attic. Baffles are installed between the insulation and the roof deck, and they help direct air from the intake vents to the exhaust vents.
Preventing ice dams with ice and water shields
Ice and water shield is a self-adhering membrane that is installed on the roof deck, under the shingles or other roofing material. It is designed to seal around nails and other roof penetrations, creating a watertight barrier that prevents water from seeping into your home. In the winter, when snow melts and refreezes, ice and water shield helps prevent water from getting under the shingles and causing damage.
Steps to install:
- Start by cleaning the roof deck and making sure it is free of any debris or protruding nails.
- Roll out the ice and water shield on the roof deck, starting at the bottom edge of the roof and working your way up. Make sure to overlap each row of ice and water shield by at least 6 inches.
- Cut the ice and water shield to fit around any roof penetrations, such as vents or chimneys, using a utility knife.
- When you reach the peak of the roof, cut the ice and water shield so that it extends over the ridge by a few inches.
- Apply a second layer of ice and water shield over the first layer, starting at the bottom edge and working your way up. Make sure to overlap each row by at least 6 inches.
- Install the shingles or other roofing material on top of the ice and water shield, making sure to nail them securely.
Installing ice and water shields can help prevent ice dams by creating a watertight barrier that prevents water from getting under the roof shingles and causing damage. By sealing around roof penetrations and overlapping each row of ice and water shield, you can create a continuous barrier that helps keep your roof and home dry.
Preventing ice dams with proper roof and gutter installation
Slope: A steeply pitched roof will allow snow and ice to slide off more easily, reducing the amount of snow that accumulates on the roof and reducing the likelihood of an ice dam forming. A roof with a slope of at least 6:12 (meaning it rises 6 inches for every 12 inches of horizontal run) is recommended for areas with heavy snowfall.
Flashing: Flashing, which is the metal or plastic material used to seal joints and prevent water from entering the roof, can also help prevent ice dams by creating a water-tight seal around roof penetrations such as chimneys, skylights, and vents.
Proper gutter installation: A proper gutter installation can help prevent ice dams by allowing for proper drainage of water and melting snow. Gutters should be clean and clear of debris to allow for proper water flow, and should be installed with a gentle slope to ensure that water is directed away from the roof and away from the foundation of your home.